

An E mail ID that is used to log in to your Apple device is known as the Apple ID. Be it an iPad, IPhone or iPod the Apple ID represents your identity by which you are recognized by the device’s system. Anything that you want to do with Apple begins with the Apple ID or the Email address that is used for logging in to the system and using the Apple services like iCloud, iTunes and App Stores. You can store content in iCloud, which is your virtual storage; songs can be bought from the iTunes Stores and apps of your choice can be downloaded from the App Store.
How many IDs
A single Apple ID or E mail can be used to access all Apple services like iCloud, iTunes and App Store and is generally recommended. This has to be configured when you set up your iPod touch, iPhone or iPad. But you can also have different addresses to access these services. Setting up one Apple ID for iCloud services and another Apple ID for store purchases from iTunes and App Store is also allowed. However, the same benefits of iCloud are available regardless of whether you use a single ID for store purchases and iCloud or two different IDs for each service.
Changing Apple ID
The primary E mail address of your Apple ID account is treated as your Apple ID. But it is possible to change the E Mail address or Apple ID to any address provided it does not match with an address that is used by another Apple ID. But again if your Apple ID ends with @mac.com, @me.com or @icloud.com then the change is not permitted. To change the ID follow the steps detailed below:
Step#1 – Sign out from the device that uses the current Apple ID for all Apple services.
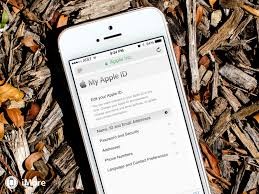
Step#2 – Go to applied.apple.com (My Apple ID).
Step#3 – Sign in to ‘Manage your Apple ID’.
Step#4 – Select the Edit mode beside the “Apple ID and Primary E mail Address.’
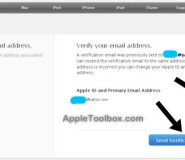
Step#5 – Type the new address of your Apple ID and save the changes. You will receive a verification E mail from Apple at that address.
Step#6 – Open the E mail and click ‘Verify now.’
Step#7 – Sign in with your new Apple ID when the My Apple ID page opens.
Step#8 – you can use the new Apple ID after you receive a message that verification is complete.
Update the features and services that you use to sync with the new Apple ID.


How to Change iCloud, iTunes, and App Store Email on iPhone/iPad