As covered before, iOS 8 brings some exciting feature-additions to the stock camera app. Apart from giving a face-lifting to the photos app – with attributes like smart exposure settings in editing and highly developed filters/search – Apple has brought in two new attributes in the camera: time-lapse and separate focus/exposure setting.
Before iOS 8, tapping long on a part of the image locked both the focus and exposure. (AE/AF Lock). While that’s handy, it’s not useful enough. You might want to focus on part of the image but have a different exposure setting. iOS 8 makes that possible on your iPhone/iPad.
Here’s how to control focus and exposure settings on your iPhone/iPad on iOS 8:
v Open the camera app
v In the Photo mode (or Square), long-tap on the part of the image you want to focus on.
v While keeping the finger pressed on the screen, swipe up or down the alter the exposure: up for brighter/larger exposure, and down for darker/lesser exposure.
v You’ll notice a brightness-slider on the right of the focus box which moves up/down depending on your swipe. (Handy exposure level indicator but not very much useful.)
v Stop the swiping when you reach the desired exposure level. You can then click the picture.
Fortunately, this is not the only place where you can edit the exposure/lightning. The Photos app comes with some new editing capabilities than before. One of them is the exposure/lightning setting which smartly lets you edit your photos for exposure.
To edit a photo:
v Tap on the photo to be edited
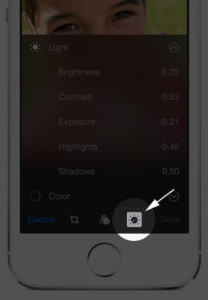
v You should see a smart adjustment icon (the one that looks like a brightness setting). Tap this.
v You’ll now see two settings to configure: Light and Color. The Light is the one we’re aiming at.
v Tap on Light and it opens up a scroller that you can swipe to adjust the exposure/lighting on the photo. (Remember, you can undo the edits later).





How to Adjust the Exposure in iPhone Camera App in iOS 8