

Android 4.3 Jelly Bean was launched 2 weeks ago. You can find the Android 4.3 images at this link. We will show you the steps on how to root your nexus device (Nexus 4, Nexus 7, Nexus 10 and Galaxy Nexus). Rooting refers to gaining super-user/root-user access on your smartphone device.
Prerequisites and Requirements:
- Nexus device with Jelly Bean Firmware Android 4.3 (Check firmware and device model to be correct Settings-> About Phone -> [Model Number] & [Android Version])
- Computers or laptops with Windows install on it.
- Download and install the USB driver for your Nexus device from our Android USB Driver page.
- Complete installation by connecting USB cable to computer. You will see windows trying to install the driver for your Nexus device.
- If it is already installed, then above step can be skipped.
- Permit USB Debugging on the device. (On your phone, goto Settings-> About Phone. Tap the Build Number seven times. This will enable Developer Options in the main settings menu. Turn on USB Debugging in the Developer Options, and plug the device into your PC via the USB cable).
- To avoid battery blackout charge your phone to 60-80% to avoid any interruption till the end of this tutorial.
- A backup on media and data files in recommended; so to restore the files and data if necessary. You may use Titanium Backup for this purpose.
We will be outlining two methods for rooting:
- Chainfire’s Auto Root which more suited for the Nexus 7 device.
- The generic flashing of custom recovery & SuperSU for the rest of the nexus devices like Nexus 4, Nexus 10 and Galaxy Nexus.
Rooting Nexus 7 (Wi-Fi & 3G Models ) using CF-Auto-Root
Requirements:
- CF Auto Root package for Nexus 7 Wi-Fi [download] / CF Auto Root package for Nexus 7 3G [download]
- Android USB Driver for Nexus 7 installed on you computer.
- USB Debugging enabled on the device.
- 80% or more battery power remaining on the tablet.
- Set up Android ADB and Fastboot on Windows.
Procedure:
- Extract the downloaded CF-Auto-Root package (remember the location where you saved the extracted at).
- Reboot the Nexus 7 into fastboot mode using the combination of volume up, volume down and power buttons.
- Turn off Nexus 7.
- Press and hold down Volume Up + Volume Down buttons. Then power on Nexus 7.
- Release all buttons when you see Google Logo.
- Google Nexus 7 Fastboot Mode will be loaded then.
- Once in fastboot, connect the device to the PC using the supplied USB cable. Wait for the fastboot drivers to configure themselves.
- Navigate to the folder where the downloaded files from CF Auto Root were extracted, and look for the file that says “root-windows.bat”. Double-click to run it.
- Follow the on-screen instructions until you reach the point when the tablet reboots back into normal mode.
The Nexus 7 running Android 4.3 is now rooted. You may verify that by going to the app drawer and looking for SuperSU app or to confirm root status please download root checker.
Rooting Nexus 4, 10 and Galaxy Nexus using SuperSU
Requirements:
- Configure Android SDK on your computer [Link]
- Install a Custom recovery like ClockworkMod or TWRP which you can flash using the Nexus Root Toolkit [Link]
- Nexus 4, 10 or Galaxy Nexus with unlocked bootloader which you can have using the Nexus Root Toolkit mentioned above
- SuperSU 1.50 by Chainfire [Link]
Procedure:
- Download the SuperSU ZIP package and transfer it to the /root folder of your device.
- (Optional) If you don’t have a custom recovery installed, do it now using your preferred method (ideally you’d want to do that via fastboot).
- Boot the device into recovery and flash the SuperSU ZIP file.
- Power off your smartphone completely.
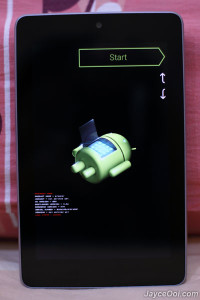
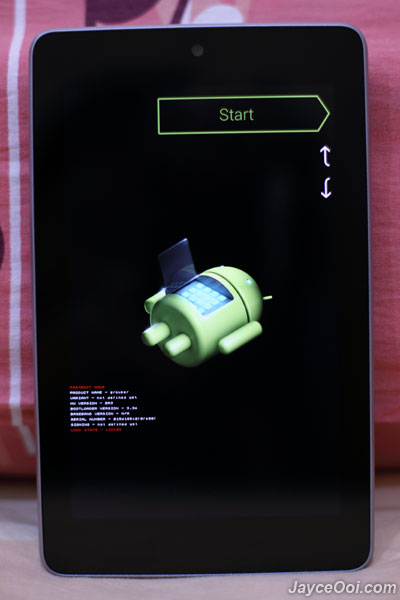
- Press and hold Volume Up, Volume Down and Power buttons simultaneously.
- Release the buttons when the Bootloader / Fastboot mode menu appears.
- You will see the ‘Start’ button listed on this screen, press Volume Down or Up until the ‘Start’ text changes to Recovery Mode.
- Press Power to confirm that you wish to boot into Recovery Mode.
- That’s it. Use the Custom Recovery Mode options and flash custom ROMs, apply root or complete any of the tasks that you find while browsing this new area of your device. Use this to flash the SuperSU.zip file you downloaded.
- After you’ve flashed the superuser package, wipe cache and dalvik cache, just to be on the safe side.
- Reboot.
Done! Your Nexus 4, 10 or Galaxy Nexus is now running a rooted version of Android 4.3. You may verify that by going to the app drawer and looking for SuperSU app or to confirm root status please download root checker.


How to root Android 4.3 on Nexus smartphones – Nexus 4, Nexus 7, Nexus 10 and Galaxy Nexus