

The easiest way to add content to and remove from your iPhone is by syncing it through iTunes. iTunes is the place where you keep all your content: Music, Playlists, Movies, Apps, Books and so on. You can sync through your USB cable that came with the iPhone or just over the air using your local Wi-Fi. In this guide we will discuss the process of syncing from the beginning, and also we will cover all the syncing opportunities you have in iTunes. Let’s begin.

 First of all, you need to download and install iTunes, which will prepare your computer for upcoming connections. Download iTunes for OS X or Windows here.
- After the installation process is complete, connect your iPhone to computer via USB cable. At this step, iTunes should pop-up in a second.
- You can notice that an “iPhone” button appeared in the top-right corner of iTunes. Clicking on it will direct you to the Summary tab of you device.

Now if you want to sync your iPhone over Wi-Fi, see the Sync with this iPhone over Wi-Fi checkbox under the Options section. If you check it, you can unplug your iPhone from the computer and it will still be shown in iTunes and ready for syncing.
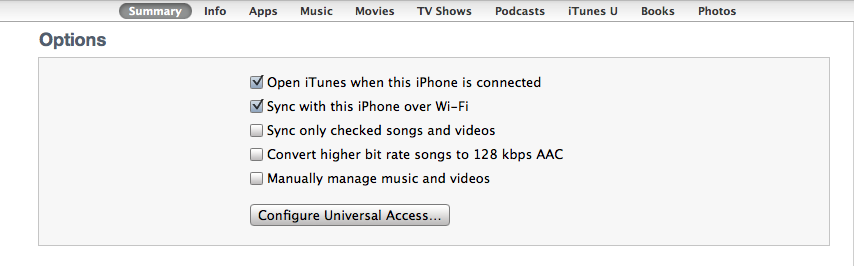
Another useful option is Sync only checked songs and videos. By default, iTunes fills up your iPhone with all music and movies you have imported in iTunes. This option comes in handy when your iTunes library is heavier than your iPhone’s capacity.
Next, head over to the Apps tab. Here you have the list of apps downloaded from your iTunes library. To sync apps to your iPhone, click the Install button next to each app’s name (you notice how the app icon appears on the home screens to the right). Similarly, click on Remove button to uninstall an app from your iPhone.

You can arrange the apps on your home screens before syncing. When you’re ready, go ahead and press the Sync button below.
Next, let’s discuss Music. Click on the Music tab and check Sync Music if it’s not already done. How we mentioned before, iTunes syncs your entire music library by default. To change that, check Selected playlists, artist, albums and genres.

By doing that, 4 windows appear below where you can fully-customize which songs are going to your iPhone. You can sync you’re previously created Playlists, some Albums, an entire Artist or even Genres. I personally found it very handy to create Playlists for different moods I could be in and then sync those playlists to my iPhone. However, if you have extra space available, why not syncing all your library?
Movies, TV Shows, Podcasts, Books are pretty much the same.

You can sync an entire Season or only the last series of a TV Show you haven’t watched yet.

The last but not the least is Photos. Is very easy to customize your photos on your iPhone. You can sync photos from iPhoto based on Albums, Events and Faces (say what?). However, if you don’t use iPhoto to organize your photo library or simply you’re on Windows – you can sync photos from the Pictures folder on your computer or any other folder you want.

I hope you found this guide useful for you. Although iTunes seams a pretty nice tool to organize your content, there are some good 3rd party apps too on the market. They work quite similarly but without syncing. iFunBox is one of them and it’s available for free. If you’re seeking for a more advanced and clean tool, iExplorer comes at hand with a much more extended functional with only $34.99. Find out more about this app here.


How to Sync iPhone to Computer